A step-by-step overview
Jupyter notebooks are where machine learning models go to die.
Wait— what?
Unlike what you probably learned in University, building models in a Jupyter notebook or R Studio script is just the very beginning of the process. If your process ends with a model sitting in a notebook, those models almost certainly didn’t create value for your company (some exceptions might be it was only for analytics or you work at Netflix).
That doesn’t mean that your models aren’t excellent. I’m sure they are. But it probably does mean the people paying you are not super excited by the outcome.
In general, companies don’t care about state-of-the-art models, they care about machine learning models that actually create value for their customers.
That process of going from a great model in a notebook to a model that can be integrated into part of a product or accessed by non-technical users is what I want to talk about in this post.
So, if you want your models to stop dying in notebooks and actually create value, read on.
Models are Code and Code Needs to be Trusted
Your first step will be getting your code to a quality level that you can trust to put into production. I want to highlight 3 important things that should happen in this step: have a good README, write clean functions, and test your code.
Good READMEs are so important. They should allow anyone (including yourself) to easily see why this code was written, what assumptions were made, what constraints existed, and how to use the code. For machine learning code you should also describe and/or link to experiments that were run so people can view the process of creating your models. Don’t be afraid to include images, GIFs, and videos in your READMEs. They can help make it much easier to understand.
This post will not teach you everything you need to know to write clean functions. But some important items to remember:
- Use easy to understand function and variable names
- Functions should only do one thing
- Include documentation and use types
- Use a style guide such as PEP8
Last, but not least, you need to test your code! Tests allow you to have confidence that your code functions as expected and that when you make changes, you didn’t actually break anything. The simplest place to start is with unit tests. For Python, look at the pytest and unittest libraries to manage your tests.
Containerize Your Code
You’ve probably heard of Docker. Docker is by far the most popular way developers containerized their code. But what is Docker? On their website, Docker states:
Containers are a standardized unit of software that allows developers to isolate their app from its environment, solving the “it works on my machine” headache. For millions of developers today, Docker is the de facto standard to build and share containerized apps.
So — Docker is a way to containerize your applications and containerization isolates your app from its environment. In simple terms that means that if you can get your code running inside Docker on your local machine, it should then run anywhere. This is increasingly important as many turn to cloud providers such as AWS to deploy their applications.
To get started, download Docker, create a DockerFile which tells Docker how to build the environment for your application, build your Docker image from your DockerFile, and finally run your Docker image.
Each of those steps has some complexity to it, but just take a look at the Getting Started tutorial on Docker’s website and you’ll be well on your way to containerizing your code inside Docker.
Make Your Model Easy to Access

You now have clean, containerized code, but no easy way for your users to interact with your machine learning model.
The simplest way to fix this problem is to put your model behind an API and expose it via a webpage.
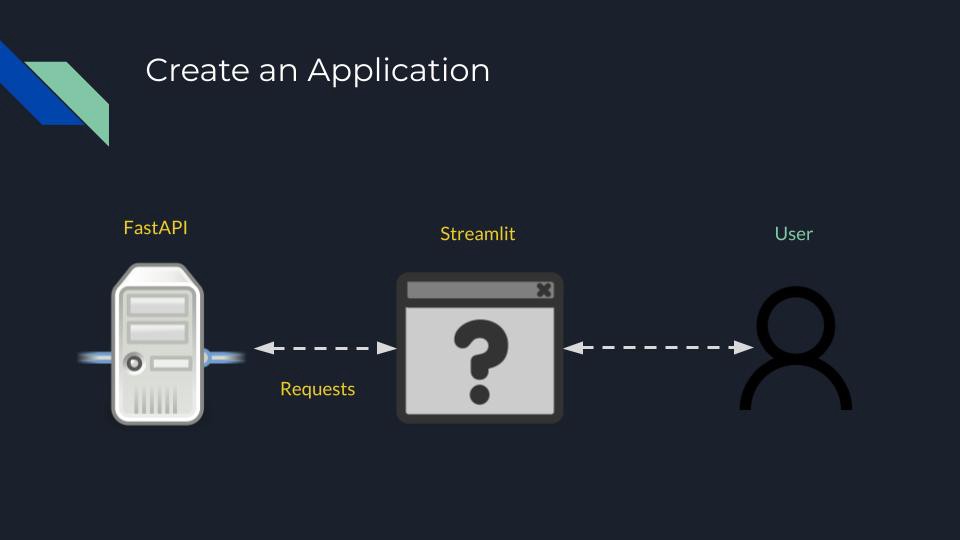
An application program interface or API is a way you can allow applications to interface with your code, or in our case, models. For example, if you create an API for a classification model, your API would take in the necessary data to make predictions (usually in JSON format) and then return the prediction based on those data. APIs are useful for many reasons, but a big one is it creates separation between your code and your user interface. You generally interact with APIs via web requests.
Python has two awesome libraries to make this process pretty simple. First, FastAPI makes it straightforward to create an API for your model. Second, the requests library in Python makes it easy to communicate with your APIs.
Once you have an API for your model, you then need to create a front-end application for your users. Many data scientists fear this step because they have limited or no knowledge of how to create websites. Fortunately, there is a solution! The Streamlit Python library. Streamlit is a library that allows you to create web applications in Python without having to know anything about creating websites. They also have great documentation, so go check it out to get started building your web app for your model.
At this point, you now have your backend API code, your front-end web application, and web requests which connect the two. Treat these as separate applications to be containerized using Docker.
Deploy to the Cloud
Up to this point, all of your work has been on your local machine. If things have gone well you have a front-end web app running on your machine that allows you to access your machine learning model predictions.
The problem, though, is that only you have access to this web app!
To fix this, we will deploy your application to the cloud and because you have already containerized your code, this process is actually pretty easy.
The three main cloud providers are AWS, Google Cloud, and Microsoft Azure. They all provide pretty similar functionality and for learning, you can’t really pick wrong. I would suggest choosing the cloud which currently has the most free credits for you to use.
No matter which cloud you select, I would start by looking at their platform as a service offerings. On Google you have Google App Engine, for Amazon, you have Elastic Beanstalk and Microsoft has Azure App Services. All of these services make it easy for you to deploy a Docker container to the cloud.
Once your web app and API containers are deployed to these platforms, you will then have a public URL you or anyone can access to interact with your machine learning model. Congratulations!
How to Learn More
I hope this overview on how to deploy machine learning models helped you understand the basic steps to deploying your models. There is almost infinite complexity when it comes to this process and if you’d like to get an even deeper overview, check out this free course.
This article was published at Towards Data Science.


