Part 6 of Learn Enough Docker to be Useful
Pushing the food metaphor running through these articles to the breaking point, let’s compare data in Docker to spices. Just as there are many spices in the world, there are many ways to save data with Docker.

Quick FYI: this guide is current for Docker Engine Version 18.09.1 and API version 1.39.
Data in Docker can either be temporary or persistent. Let’s check out temporary data first.
Temporary Data
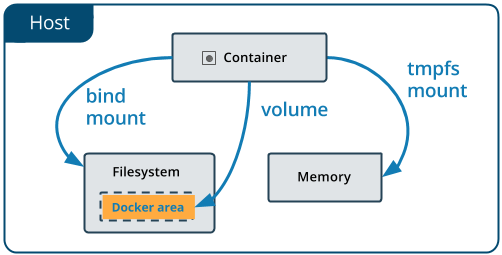
Data can be kept temporarily inside a Docker container in two ways.
By default, files created by an application inside a container are stored in the writable layer of the container. You don’t have to set anything up. This is the quick and dirty way. Just save a file and go about your business. However, when you container ceases to exist, so will your data.
You have another option if you want better performance for saving temporary data with Docker. If you don’t need your data to persist beyond the life of the container, a tmpfs mount is a temporary mount that uses the host’s memory. A tmpfs mount has the benefit of faster read and write operations.
Many times you will want your data to exist even after the container is long gone. You need to persist your data.
Persistent Data
There are two ways to persist data beyond the life of the container. One way is to bind mount a file system to the container. With a bind mount, processes outside Docker also can modify the data.

From the Docker Docs
Bind mounts are difficult to back up, migrate, or share with other Containers. Volumes are a better way to persist data.
Volumes
A Volume is a a file system that lives on a host machine outside of any container. Volumes are created and managed by Docker. Volumes are:
- persistent
- free-floating filesystems, separate from any one container
- sharable with other containers
- efficient for input and output
- able to be hosted on remote cloud providers
- encryptable
- nameable
- able to have their content pre-populated by a container
- handy for testing
That’s a lot of useful functionality! Now let’s look at how you make a Volume.

Volumes
Creating Volumes
Volumes can be created via a Dockerfile or an API request.
Here’s a Dockerfile instruction that creates a volume at run time:
VOLUME /my_volume
Then, when the container is created, Docker will create the volume with any data that already exists at the specified location. Note that if you create a volume using a Dockerfile, you still need to declare the mountpoint for the volume at run time.
You can also create a volume in a Dockerfile using JSON array formatting. See this earlier article in this series for more on Dockerfiles.
Volumes also can be instantiated at run time from the command line.
Volume CLI Commands
Create
You can create a stand-alone volume with docker volume create —-name my_volume.
Inspect
List Docker volumes with docker volume ls.
Volumes can be inspected with docker volume inspect my_volume.
Remove
Then you can delete the volume with docker volume rm my_volume.
Dangling volumes are volumes not used by a container. You can remove all dangling volumes with docker volume prune. Docker will warn you and ask for confirmation before deletion.
If the volume is associated with any containers, you cannot remove it until the containers are deleted. Even then, Docker sometimes doesn’t realize that the containers are gone. If this occurs, you can use docker system prune to clean up all your Docker resources. Then you should should be able to delete the volume.

Where your data might be stored
Working with --mount vs. --volume
You will often use flags to refer to your volumes. For example, to create a volume at the same time you create a container use the following:
docker container run --mount source=my_volume, target=/container/path/for/volume my_image
In the old days (i.e. pre-2017) the --volume flag was popular. Originally, the -v or --volume flag was used for standalone containers and the --mount flag was used with Docker Swarms. However, beginning with Docker 17.06, you can use --mount in all cases.
The syntax for --mount is a bit more verbose, but it’s preferred over --volume for several reasons. --mount is the only way you can work with services or specify volume driver options. It’s also simpler to use.
You’ll see a lot of -v’s in existing code. Beware that the format for the options is different for --mount and --volume. You often can’t just replace a -v in your existing code with a --mount and be done with it.
The biggest difference is that the -v syntax combines all the options together in one field, while the --mount syntax separates them. Let’s see --mount in action!

Easy enough to mount
--mount — options are key-value pairs. Each pair is formatted like this: key=value, with a comma between one pair and the next. Common options:

Wrap
Recap of Key Volume Commands
docker volume createdocker volume lsdocker volume inspectdocker volume rmdocker volume prune
type=volumesource=volume_namedestination=/path/in/containerreadonly


